IT and the Internet become increasingly important in our homes – not only after the COVID-19 crisis, in which many of us have to work from home. Also because of streaming services, tons, and tons of digital pictures, wireless devices, smart homes, and many more. During the pandemic, home-IT might be even more important as we have to rely on it to work, make backups, store data, and so forth. And, to not forget, it has to blend in into our homes, ideally without even being noticed.
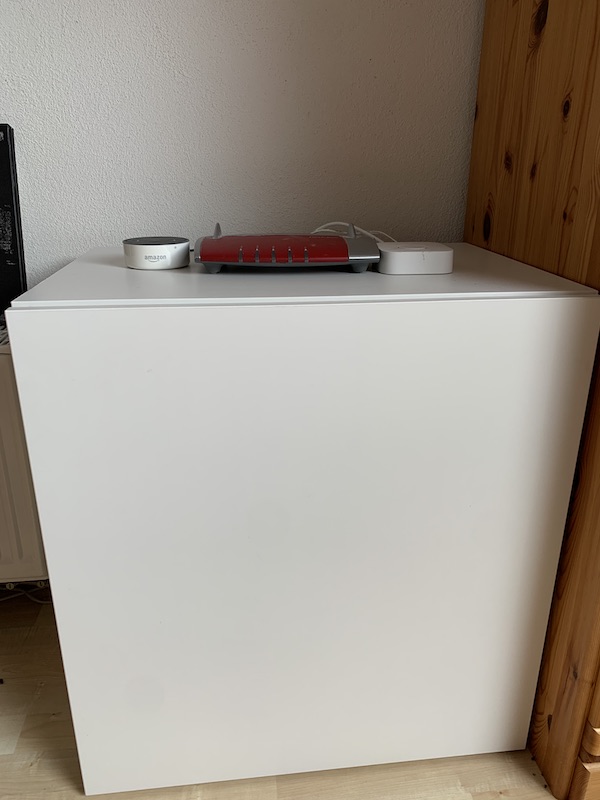
This, of course, are conflicting goals. And I, as well, was looking for solutions to hide network switches, cabling, two network-attached storage devices, router, raspberry pi, and supporting devices such as surge protection, etc. In my case, my home IT was located in three main areas and rooms: Behind and around my TV, on a cupboard and behind my desk. Also, this setup grew and was changed several times over the years and included five switches, some of them still 100MBit switches, a lot of erratic and old cabling, and not so ideal locations of hardware. The NAS devices were visible from the living room, the lights annoyed in the evening and you could hear them. TIME FOR A CLEAN SLATE SOLUTION!
I did a lot of research on the internet and did not find exactly what I was looking for. Most solutions were made for basements and were open, not confined. Most components had to come together in one place and must become invisible. This is why I decided to write this article to share my experience.
Item list
- 1x IKEA BESTÅ 60x40x64 corpus with a door, shelf, and RFID lock
Cheap, neutral looking cabinet, large enough to house everything but small enough to be placed flexibly in the office area. - 1x Egg carton foam
Noise insulation of the cabinet. - 1x 125mm USB-powered fan with dust protection
Cooling of the cabinet. I chose for a USB powered fan with dust protection to have easy cabling and no dust inside the installation. - 2x RJ45 surge protectors
I have two long network cables coming in and going out of my network hub. One, about 30 meters long ranges down to the basement where my modem is, the other one, about 20 meters long to my TV setup. Long network cables are prone to power surges due to thunderstorms etc. so, both had to get additional protection. - 1x Fan cover
The fan cover is there to one the one hand protect the fan from the outside but also to reduce noise coming from the fan. - 1x Rack screw set
Screws to mount the 19″ equipment to the rack frame and backplane. - 4x 5 0,5m CAT6 patch cables
Connect components inside the cabinet. Mostly the switch and the patch panel. - 2x surge protectors for electricity and network
I had these before and they act as the last line of defense and protect my two NAS for power surges over the electric wire and network cables. - 1x 19″ CAT6 patch panel
The patch panel ensures that I can access many network ports from the back of the cabinet and that I do not have to route many ables in and out of it. - 2x surge protected power strips
I chose two power strips because I needed about 10 ports. One 10-port power strip would be wider than the cabinet, so I chose for two. Also, they protect all devices for power surges. - 1x cable lead-through
The cable lead-through is for routing cables to the top of the cabinet for the router, alexa, and Hue hub. - 1x 19″ cable lead-through
I mounted the 19″ lead-through on top of the switch so that all cables coming from the switch would not just hand down but are stored and routed to the back. - 1x Linksys LGS124-EU 24-Port Unmanaged Gigabit Network Switch
I wanted to have at least 24 ports (currently only needing around 10) because the system should also be capable of serving a whole house with many connections. It obviously had to be gigabit ethernet and fan-less. I voted against a managed switch because I do not need different VLANs etc. I mainly control my network through my router and my Raspberry Pi. - 1x 19″ Open Frame Rack
The rack holds the switch and the lead-through to the shelf floor. - 2x Air outlet
The air outlets are for letting air out of the cabinet and to let it circulate inside of it.
Layout
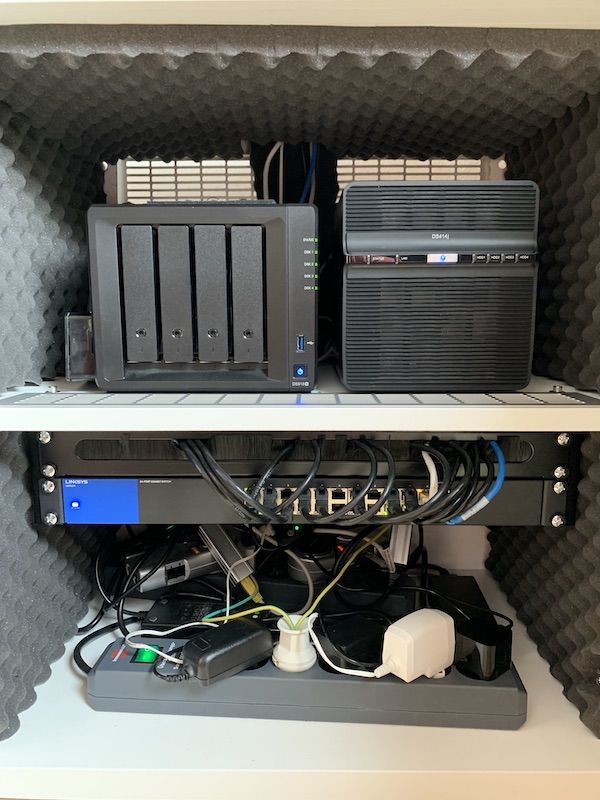
The setup is pretty simple: All electrics, such as surge protectors (4. & 8.), power strips (10.) and more, are located in the lower part. I mounted the 19″ rack frame (14.) to the shelf. It holds the switch (13.) and the cable lead-through (12.) with the screw set (6.). The patch panel was mounted to the backplane so that I have simple plug-and-play connectors at the back without the need to feed many cables into the cupboard. I placed my two Synology NAS and my PI on the top of the shelf, directly connected to the switch.
The router, the Philips Hue Hub, and one of my Amazon Alexa are on top of the cabinet because of the antennas and good reception. To get the cables through the top of the cupboard, I used cable lead through (11.) – so all cabling and power adapters are inside the installation.
Cooling & Noise Reduction
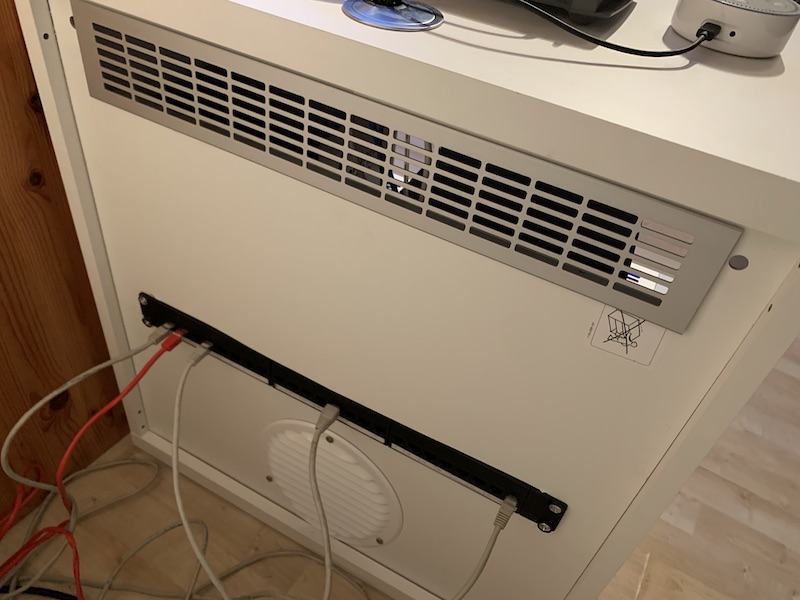
I mounted the fan (3.) at the bottom in the middle of the BESTÅ (1.) protected by the fan cover (5.) on the back. It blows air into the case through its dust cover. On the shelf in the middle of the cupboard, I cut a hole at the front end and installed the air outlet (15.). I installed the other outlet at the very top of the backplane. By this, I created an air circulation where cold air comes in at the back bottom part of the cabinet, then it flows to the front and upwards to the two NAS who push air from the front to the back, where the hot air can exit the cupboard at the top back.
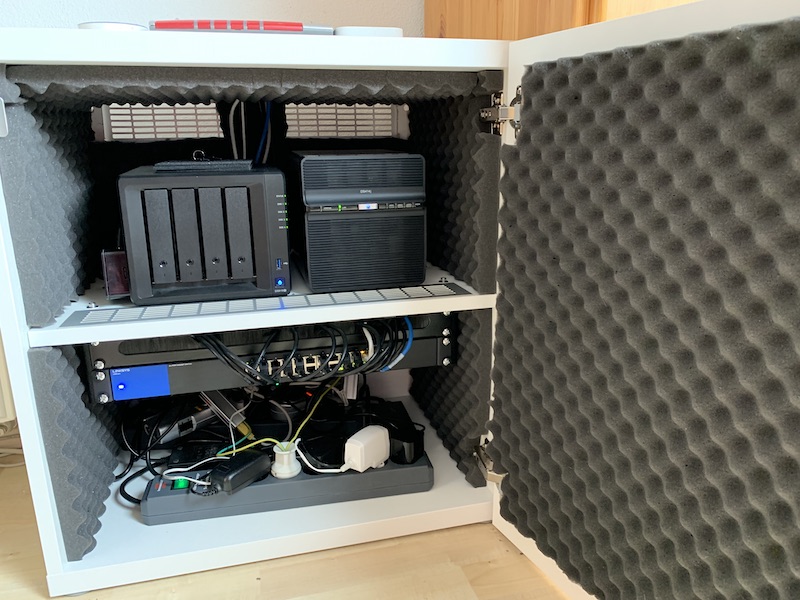
I covered the inside walls of the cabinet with the egg carton foam (2.). This already recedes the noise drastically. To also get rid of the fan noise, coming from the back, I installed a fan cover (5.). I also chose a switch which has no fans – as 19″ equipment usually uses small fans, which makes a lot of noise. Now, the whole installation is barely noticeable.
What could I have done better?
The electricity cabling is quite messy in the lower part of the cabinet. I suppose if I had mounted the power strips to either side of the cupboard. Also, the patch panel currently is at the same hight as the switch. And because I mounted the switch as far back as possible, the patch panel, although I chose one with RJ45 plugs, is not very well accessible. Also, it covers the cutout which I need to route cables from the lower to the upper part of the cabinet. A good solution is to mount the patch panel very low on the backplane – maybe even below the fan.